install.packages("devtools")
devtools::install_github(repo = "stefvanbuuren/mice")3 Version Control
Also known as: Git, GitHub and avoiding potential Gitshows
Lecture Week 3
3.1 Introduction
Dear all,
As a statistician / data scientist / developer you’ll need to master many skills. Some of these skills are made simple with tools. This week we’ll bite the bullet by learning about two massively important tools for your toolset: version controlling and simulation.
To document our activity and our changes in detail, we’ll use Git. You can view Git as the ability to go back in time. Back to the very beginning of your project. A bonus: Git integrates nicely with RStudio. In this series of exercises we will learn
- How to integrate
Gitwithin our projects. - How to publish our projects as
GitHubrepositories - How to go about development with
GitandGitHub - How to solve scenarios where
Githits the fan.
And in the meanwhile we’ll also Monte Carlo simulate one of the most important concepts in statistics:
- Confidence Validity
Use the appropriate channels to ask questions and hand-in your work.
All the best,
Gerko and Hanne
3.2 Preparation
Read Excuse me, do you have a moment to talk about version control? by Jennifer Bryan and watch the following clip where Linus Torvalds explains that he merely created Git to manage his other project
3.3 Supplementary material
Git The following links are very useful:
An old video walkthrough about
GitandRstudioGitHub Glossary for all terminology
this online
Gitbook is a very good resourceThis book covers pretty much everything you need to marry
GitandR.
In previous years, we also discussed Monte Carlo simulation in detail in class. If you want to learn more about this, then study this old markup languages course page.
3.4 Git and GitHub
3.4.1 Git
Git is a free and open source version control system for text files. It can handle extensive change logging for you, no matter the size of the project. Git is fast and efficient, but its effectiveness depends also on the frequency you instruct it to log your project’s changes.
You can see Git as a blank canvas that starts at a certain point in time. Every time you (or others) instruct Git to log any changes that have been made, Git adds the changes that are made to this canvas. We call the changes to the canvas commits. With every commit an extensive log is created that includes at least the following information:
- the changes made
- who made the changes
- metadata
- a small piece of text that describe the changes made
The difference between two commits - or the changes between them - are called diffs.
If you’d like to know much more about Git, this online book is a very good resource. If you’d like to practice with the command line interface use this webpage for a quick course. This book covers pretty much everything you need to marry Git and R.
3.4.2 GitHub
GitHub is the social and user interface to Git that allows you to work in repositories. These repositories can be seen as project folders in which you publish your work, but you can also use them as test sites for development, testing, etcetera. There is a distinction between private repositories (only for you and those you grant access) and public repositories (visible for everyone).
Your public repositories can be viewed and forked by everyone. Forking is when other people create a copy of your repository on their own account. This allows them to work on a repository without affecting the master. You can also do this yourself, but then the process is called branching instead of forking. If you create a copy of a repository that is offline, the process is called cloning.
GitHub’s ability to branch, fork and clone is very useful as it allows other people and yourself to experiment on (the code in) a repository before any definitive changes are merged with the master. If you’re working in a forked repository, you can submit a pull request to the repository collaborators to accept (or reject) any suggested changes.
For now, this may be confusing, but I hope you recognize the benefits GitHub can have on the process of development and bug-fixing. For example, the most up-to-date version of the mice package in R can be directly installed from the mice repository with the following code:
You can see that this process requires package devtools that expands the R functionality with essential development tools. Loading packages in R directly from their respective GitHub repositories, allows you to obtain the latest - often improved and less buggy - iteration of that software even before it is published on CRAN.
3.4.3 Installing Git
3.4.3.1 Installing on Mac
I suggest you install Git by downloading and installing GitHub Desktop. GitHub’s desktop application is a nice GUI and, naturally, integrates well into the repository workflow on GitHub.
When installed, you can go to GitHub Desktop > Install Command Line Tool
After a reboot, all should be set.
3.4.3.2 Installing on Windows
Download and install Git for Windows, Then download and install GitHub Desktop. GitHub’s desktop application is a nice GUI and, naturally, integrates well into the repository workflow on GitHub.
After a reboot, all should be set.
3.4.4 Command line interface vs. GUI
Ultimately, you’ll want to learn how to use Git through the command line interface (CLI). It offers better and more comprehensive functionality. Again, take this 15-minute course to get a gentle introduction. But do not be afraid that you miss out on the CLI if you don’t study this link: In week 4 we’ll explore in detail how to handle Git when things go haywire. You’ll be a CLI-wizard by then.
3.4.5 .gitignore
GitHub sees every file in your repository as one of the following three
- tracked files that have been (previously) staged and committed
- untracked files that have not been staged or committed
- ignored files that have been explicitly ignored
It may be wise to instruct Git to ignore changes in some files. For example, compiled files (think about .com, .exe, .o, .so, etc), archives (e.g. .zip, .tar, .rar), logs (.log) and files generated in runtime (.temp) do not have to be tracked by Git. The same holds for hidden system files (e.g. .DS_Store or Thumbs.db). Adding such filetypes to a file named .gitignore and placing that file in the root of your repository will take care of focusing Git’s energy on useful files only. For common .gitignore examples, see this repository. There are many examples inside, such as this .gitignore example for R
3.4.6 Linking GitHub and RStudio
Securely linking your local machine to the remote repository is vital when collaborating with other people. In short; you would not want a potential hacker to have contributor access to any of your projects. I have prepared this walkthrough video that details the process of linking GitHub to your machine and RStudio. Below I explain the rationale of using both an SSH key and a personal access token.
If you still experience problems after following my walkthrough, check this chapter
To learn more about maintaining a package as GitHub repository within RStudio, have a look at this guide by Hadley Wickham.
3.4.7 SSH keys
With an SSH key you can identify yourself to an online server (in this case the GitHub server) without having to log in every time. It is like your machine having access to an online server through a unique biometric security measure, but instead of biometric data a bits-and-bytes hash code is communicated every time. You can use an SSH key to link RStudio to your GitHub repository, but it is better to use a personal access token for this. See below.
3.4.8 Personal access tokens
If you use GitHub’s 2FA functionality - you should! - your username and password are not sufficient to push commits to GitHub through RStudio. To solve this follow these steps on github.com like I detail in this walkthrough video:
- Log in to your account
- Click on your profile photo (upper right corner) and select
Settings - Go to
Developer settings - Select
Personal access tokensin the left sidebar. The classic token as it is now called is sufficient - Click
Generate new token - Give the token a name
- Select at least the
reposcope; you’ll need these permissions to access repositories. Also choose a relevant expiration: the longer the better, the shorter the safer. Remember that you can always generate a new token if you need to. - Click Generate token
Copy the token. The token will not be displayed again, so copy-paste it directly where it is needed. Remember that you can always generate a new token if you need to.
In RStudio, paste the generated token in the password field when RStudio asks for your credentials. The token will now serve as the unique authenticated link instead of your password.
3.5 Exercise 1: Git started with GitHub
- Fork this year’s course repository. You can do this by clicking the
Forkbutton on the top right of the repository page. This will create a copy of the repository on your ownGitHubaccount. - Clone the fork to your machine. You can do this by clicking the green
Codebutton and copying the URL. Then openRStudioand go toFile > New Project > Version Control > Git. Paste the URL in theRepository URLfield and choose a directory where you want to store the repository on your machine. - Create a new branch called
wk3 - Update the file
story.qmdby adding three words to the sentence and commit the changes. You can do this by clicking on theGittab inRStudio, selecting the files you want to commit (only one in this case!), writing a commit message and clicking theCommitbutton. - Push to your
GitHubfork. You can do this by clicking the greenPushbutton in theGittab inRStudioor by using - Send a pull request (PR) to incorporate your changes into the
upstream/mainbranch (i.e.gerkovink/markup@main). You can do this by going to your fork onGitHuband clicking thePull requestbutton. Make sure to select the correct branches. - If you’re fast enough, your commit will not result in a conflict. We will merge the PR’s in the order they are presented in, as long as there are no conflicts.
- If need be, update your PR by simply submitting another commit and pushing it to your fork. This will update the PR automatically.
Monte Carlo simulation exercise (no need to hand in)
- Perform a small simulation that does the following:
- Sample 100 samples from a standard normal distribution.
- For each of these samples, calculate the following statistics for the mean:
- absolute bias
- standard error
- lower bound of the 95% confidence interval
- upper bound of the 95% confidence interval
- Create a plot that demonstrates the following:
“A replication of the procedure that generates a 95% confidence interval that is centered around the sample mean would cover the population value at least 95 out of 100 times” (Neyman, 1934)
- Present a table containing all simulated samples for which the resulting confidence interval does not contain the population value.
My solutions to the exercises
3.6 Exercise 2: Git it done
This week we will also learn how to use \(git\) properly when we mess up. But let’s not learn that on this year’s repo ;-). Fork [this older course repository (https://github.com/gerkovink/markup2020), deselect! Copy the master branch only in order to copy all branches and checkout the Exercise_wk4 branch.
Let’s continue this week with this second exercise.
3.6.1 Disclaimer
I’ll take you by the hand through the exercise. So if you follow this manual step by step, you’ll be done at the end and you will have a good notion of troubleshooting with Git [or a reference thereof].
This exercise is a summary of important commands. A full and comprehensive overview can be found in the pro Git book.
O, and we forgot to tell you: you’ll need the terminal for this exercise. You may use the one in RStudio, or the dedicated terminal on UNIX systems or the command prompt or Windows Terminal on Windows.
3.6.2 Prepare
Before we continue it is good to all start from the point of departure.
- Use the terminal to navigate to the
Gitrepository (the location of the git repo on your HDD) - Type
git pullto make sure that you obtain the latest state from the remote onGitHub
% git pull
Already up to date.
Don’t type the %; that is just the command prompt indicator on my machine. Yours may be different, such as > or $. We see that Git reminds me that I already have the latest state. I am up to date.
- Change the branch to the
Exercise_wk4branch.
% git checkout Exercise_wk4
Switched to branch 'Exercise_wk4'
Your branch is up to date with 'origin/Exercise_wk4'.
I’ve now been switched to the Exercise_wk4 branch. It is up to date with origin/Exercise_wk4, meaning that GitHub and my local copy are in sync. origin is a shorthand name for the remote repository that a project was originally cloned from. It is useful that origin is referenced instead of the original repo’s URL –> This makes referencing much more convenient.
3.6.3 Inspect the current state
Make sure you are in the Exercise_wk4 branch. Then Use git log --graph to inspect the current Git branch and its commits.
% git log --graph
*   commit 176137b1667cc6903f7a9eead5723892ef1a77a7 (HEAD -> master, origin/master, origin/HEAD)
|\  Merge: 0e67723 c902093
| | Author: Gerko Vink <g.vink@uu.nl>
| | Date:   Thu Oct 29 12:44:01 2020 +0100
| |
| |     Merge pull request #38 from thomasjwise/wisedev
| |
| |     Assignment 3 - Beamer PDF
| |
| |     Well done ✅
| |
| * commit c9020931678d90d91cfe21778e6ce5b4943e46cb
| | Author: Thomas Wise <48682160+thomasjwise@users.noreply.github.com>
| | Date:   Wed Oct 28 13:59:23 2020 +0100
| |
| |     Assignment 3 - Beamer PDF
| |
* |   commit 0e67723572744b769389f5b8883c9f1aa6a3b7dd
|\ \  Merge: 4134b75 1f488c6
| | | Author: Gerko Vink <g.vink@uu.nl>
| | | Date:   Thu Oct 29 11:27:16 2020 +0100
| | |
We see information about the history that brought us to this point in time. We see commit messages, the author, the dates, the SHA-1 hash and the graph tree. We asked for the graph tree with --graph.
You can scroll up and down the graph. To exit the graph window, type q. For help, type h. To obtain a more condensed graph, use
% git log --oneline --graph
*   176137b (HEAD -> Exercise_wk4, origin/master, origin/HEAD, origin/Exercise_wk4, master) Merge pull request #38 from thomasjwise/wisedev
|\
| * c902093 Assignment 3 - Beamer PDF
* |   0e67723 Merge pull request #39 from gerkovink/SofieIssue
|\ \
| * | 1f488c6 (SofieIssue) remove pipe operator
| * | 4ead406 update readme.md
|/ /
* |   4134b75 Merge pull request #37 from pietjonker/piet
|\ \
| * | f50014b commit assignment 2
| * | 5ae2b9b Assignment 1 and 2
* | |   f277a35 Merge pull request #35 from zoedunias/zoedev
|\ \ \
| * | | 1c9aad6 Added Exercise 2
* | | |   43fb1ed Merge pull request #34 from RianneKraakman/riannedev
|\ \ \ \
| * | | | 75d9293 Add assignment 2
* | | | |   d3df110 Merge pull request #33 from gerkovink/gerkodev
|\ \ \ \ \
| * \ \ \ \   34954f8 (origin/gerkodev, gerkodev) Merge pull request #22 from Goorbergh/ruben_assignment_1
This graph view is much more condensed. The nice thing about this view is the direct depiction of each action’s abbreviated SHA-1 key.
We can use the SHA-1 keys to instruct Git. For example, to obtain the history on commit c902093, we only need to refer the SHA-1 hash.
% git log c902093
commit c9020931678d90d91cfe21778e6ce5b4943e46cb
Author: Thomas Wise <48682160+thomasjwise@users.noreply.github.com>
Date:   Wed Oct 28 13:59:23 2020 +0100

    Assignment 3 - Beamer PDF

commit db649539738bb30b63d93053b67891ef6c55037e
Author: Thomas Wise <48682160+thomasjwise@users.noreply.github.com>
Date:   Wed Sep 16 14:04:21 2020 +0200

    Assignment 1

commit 21a3b5ac1535703f4ce0d6feb2ccf3703f95eee3
Merge: 7f0806b f4a11cb
Author: Gerko Vink <g.vink@uu.nl>
Date:   Tue Sep 15 20:15:25 2020 +0200

    Merge pull request #2 from gerkovink/gerkodev

    This image is too large

commit f4a11cbed729bc8454c01866aab4291b3b580d6f
Author: Gerko Vink <g.vink@uu.nl>
Or, a more condensed version of the same
% git log c902093 --pretty=oneline
c9020931678d90d91cfe21778e6ce5b4943e46cb Assignment 3 - Beamer PDF
db649539738bb30b63d93053b67891ef6c55037e Assignment 1
21a3b5ac1535703f4ce0d6feb2ccf3703f95eee3 Merge pull request #2 from gerkovink/gerkodev
f4a11cbed729bc8454c01866aab4291b3b580d6f resize image
7f0806b68387d4f3c8af5c1f27d94b69e90a2d13 Merge pull request #1 from gerkovink/gerkodev
a36ed81b3831e6084c2adf661dc4cfb32c4cb5f7 add childhood memory
9ba9c43437a7f00f5095df55db0c07d7233ad152 Add CV
9bf1c32ea55b60bce613d65765c18deb522772ff Update .gitignore
18761716665262f19296fb5d8e7c1720c8cea58a Merge branch 'master' of https://github.com/gerkovink/markup2020
1ee60aa26142b5f175928d409614b8de84c1ef79 Update .gitignore
7c3d816264b5629e7bfe112954178648d94a37b4 Delete markup_sticker_SMALL.psd
37c356ca51b4ed03e96570934f28caf5fcfd75d8 Delete .DS_Store
d56dd90172d1106117d53102e5053165bc182020 Update .gitignore
e7b78b592a8000d3a647de3a265c69496adebfe5 Update .gitignore
fdd923ad2b522d6e4357229ea801d23ec5b16717 update readme
7e14559d7f7e8676d557c9b73fc43fb3a66a0c3c added sticker
493609efa7ce659ebebf5a0d0300f23788397e68 Initial commit
Please note that we only reference the short hash. There is no need to reference the longer hash as long as the sequence of the shorter reference is unique.
From this --pretty=oneline view it is now easy to spot the origin of our course repository - the initial commit that initiated the Git goodness. You can also see that I updated the .gitignore, a hidden file that specifies which files and directories to be ignored by Git. And I did some cosmetic changes and file deletions. This is very insightfull because of the detailed, but consice commit messages.
3.6.4 Checkout an old state
Go back in time to 21a3b5ac1535703f4ce0d6feb2ccf3703f95eee3 Merge pull request #2 from gerkovink/gerkodev.
To do so, we only need to refer the start of the SHA-1 key.
% git checkout 21a3b5a
Note: switching to '21a3b5a'.

You are in 'detached HEAD' state. You can look around, make experimental
changes and commit them, and you can discard any commits you make in this
state without impacting any branches by switching back to a branch.

If you want to create a new branch to retain commits you create, you may
do so (now or later) by using -c with the switch command. Example:

  git switch -c <new-branch-name>

Or undo this operation with:

  git switch -

Turn off this advice by setting config variable advice.detachedHead to false

HEAD is now at 21a3b5a Merge pull request #2 from gerkovink/gerkodev
We are now at the old state. So we went back in time. The current state where we are is independent from all later commits, but is built exactly on all preceding commits as per the tree.
There are a couple of terms that are new:
- HEAD: The HEAD in
Gitis the pointer to the current branch reference. It is the last commit you have made or checked out [in our case]. REMEMBER that the head will always serve as the parent to the next commit - detached HEAD: The same as the head, but now the pointer references a specific commit and not a branch.
3.6.4.1 The problem with a detached HEAD
This webpage illustrates the dangers of committing changes under a detached head quite nicely:
The HEAD pointer in
Gitdetermines your current working revision (and thereby the files that are placed in your project’s working directory). Normally, when checking out a proper branch name, Git automatically moves the HEAD pointer along when you create a new commit. You are automatically on the newest commit of the chosen branch.
When you instead choose to check out a commit hash,Gitwon’t do this for you. The consequence is that when you make changes and commit them, these changes do NOT belong to any branch. This means they can easily get lost once you check out a different revision or branch: not being recorded in the context of a branch, you lack the possibility to access that state easily (unless you have a brilliant memory and can remember the commit hash of that new commit…).
The useful thing about going to an old commit is that you can take this state as a point of departure. Just beware of the pitfalls of working under a detached HEAD.
3.6.4.2 leave the detached HEAD
Go back to the branch HEAD
% git switch -
Previous HEAD position was 21a3b5a Merge pull request #2 from gerkovink/gerkodev
Switched to branch 'Exercise_wk4'
Your branch is up to date with 'origin/Exercise_wk4'.
3.6.5 Make a new branch of the old state
Let’s take that old state and make it into a proper point of departure for new things. Again, reference 21a3b5ac1535703f4ce0d6feb2ccf3703f95eee3 Merge pull request #2 from gerkovink/gerkodev, but now we make the state of 21a3b5a into a new branch. We call that branch Wk4_markup:
% git checkout -b Wk4_markup 21a3b5a
Switched to a new branch 'Wk4_markup'
We now have checked out an old state and made it into a new branch. The cool thing is that we can now commit all we want and everything will be properly logged. Just remember that if you’d like to go back in time and play around with an old state of your project –> Merge the old state into a new branch like I demonstrated above.
3.6.6 Add a new commit
We start by creating an empty text file
% touch add_text_file.txtIf the touch command does not work on your machine, you may also create this file by hand. In a Windows-terminal, you can also use the command:
PS C:\GitHub\Markup2020> New-Item .\add_text_file.txt -type fileNow, if we would like to commit the addition of this file to our repo, we get the following:
% git commit -a -m 'add text file'
On branch Wk4_markup
Untracked files:
    add_text_file.txt

nothing added to commit but untracked files present
The commit was not succesfull, because the file add_text_file.txt is not yet tracked. Note that I use -a to specify to commit all changed files and folders that are tracked. I use -m to indicate that I would like to add the message add text file.
You see that using a GUI to Git like GitHub desktop or RStudio is quite convenient if you would not like to indicate which files to track. It is also less flexible.
3.6.6.1 Add files to tracking
To track all untracked files and folders
git add -A3.6.6.2 commit with a message
Now if we revisit the commit command
% git commit -a -m 'add text file'
[Wk4_markup 8d30c46] add text file
 1 file changed, 0 insertions(+), 0 deletions(-)
 create mode 100644 add_text_file.txt
3.6.7 Study the log again
% git log --pretty=oneline
8d30c4698b9761d650de2f5288389257762753ce (HEAD -> Wk4_markup) add text file
21a3b5ac1535703f4ce0d6feb2ccf3703f95eee3 (old-state) Merge pull request #2 from gerkovink/gerkodev
f4a11cbed729bc8454c01866aab4291b3b580d6f resize image
7f0806b68387d4f3c8af5c1f27d94b69e90a2d13 Merge pull request #1 from gerkovink/gerkodev
a36ed81b3831e6084c2adf661dc4cfb32c4cb5f7 add childhood memory
9ba9c43437a7f00f5095df55db0c07d7233ad152 Add CV
9bf1c32ea55b60bce613d65765c18deb522772ff Update .gitignore
18761716665262f19296fb5d8e7c1720c8cea58a Merge branch 'master' of https://github.com/gerkovink/markup2020
1ee60aa26142b5f175928d409614b8de84c1ef79 Update .gitignore
7c3d816264b5629e7bfe112954178648d94a37b4 Delete markup_sticker_SMALL.psd
37c356ca51b4ed03e96570934f28caf5fcfd75d8 Delete .DS_Store
d56dd90172d1106117d53102e5053165bc182020 Update .gitignore
e7b78b592a8000d3a647de3a265c69496adebfe5 Update .gitignore
fdd923ad2b522d6e4357229ea801d23ec5b16717 update readme
7e14559d7f7e8676d557c9b73fc43fb3a66a0c3c added sticker
493609efa7ce659ebebf5a0d0300f23788397e68 Initial commit
We can see that the HEAD is now at the latest commit and that this commit comes after the old-state from which we created the branch.
3.6.7.1 Now add another empty text file.
% touch add_another_text_file.txtLet’s say that we rather would have included this file in the previous commit, we can achieve this by
% git add -A
% git commit --amend -m "add two text files"
[Wk4_markup 9e6c38c] add two text files
 Date: Tue Nov 3 23:09:11 2020 +0100
 1 file changed, 0 insertions(+), 0 deletions(-)
 create mode 100644 add_text_file.txt
We have effectively ammended the previous commit. We’ve also changed the commit message into add two text files:
% git log --pretty=oneline
9e6c38c2288f7e7fce75de3bd1ffb522de112a8b (HEAD -> Wk4_markup) add two text files
21a3b5ac1535703f4ce0d6feb2ccf3703f95eee3 (old-state) Merge pull request #2 from gerkovink/gerkodev
f4a11cbed729bc8454c01866aab4291b3b580d6f resize image
7f0806b68387d4f3c8af5c1f27d94b69e90a2d13 Merge pull request #1 from gerkovink/gerkodev
a36ed81b3831e6084c2adf661dc4cfb32c4cb5f7 add childhood memory
9ba9c43437a7f00f5095df55db0c07d7233ad152 Add CV
9bf1c32ea55b60bce613d65765c18deb522772ff Update .gitignore
18761716665262f19296fb5d8e7c1720c8cea58a Merge branch 'master' of https://github.com/gerkovink/markup2020
1ee60aa26142b5f175928d409614b8de84c1ef79 Update .gitignore
7c3d816264b5629e7bfe112954178648d94a37b4 Delete markup_sticker_SMALL.psd
37c356ca51b4ed03e96570934f28caf5fcfd75d8 Delete .DS_Store
d56dd90172d1106117d53102e5053165bc182020 Update .gitignore
e7b78b592a8000d3a647de3a265c69496adebfe5 Update .gitignore
fdd923ad2b522d6e4357229ea801d23ec5b16717 update readme
7e14559d7f7e8676d557c9b73fc43fb3a66a0c3c added sticker
493609efa7ce659ebebf5a0d0300f23788397e68 Initial commit
3.6.8 Undo a commit
When shit hits the fan, we can always undo a commit. For example, the following command reverts all changes to the inital commit
% git reset --hard 493609e
HEAD is now at 493609e Initial commit
We are now back at the first commit in the project.
3.6.9 Undo undoing a commit
To properly do this without making mistakes, it is best to study the history of the HEAD
% git reflog
493609e (HEAD -> Wk4_markup) HEAD@{0}: reset: moving to 493609e
9e6c38c HEAD@{1}: commit (amend): add two text files
8d30c46 HEAD@{2}: commit: add text file
21a3b5a (old-state) HEAD@{3}: checkout: moving from Exercise_wk4 to Wk4_markup
176137b (origin/master, origin/HEAD, origin/Exercise_wk4, master, Exercise_wk4) HEAD@{4}: checkout: moving from Exercise_wk4 to Exercise_wk4
176137b (origin/master, origin/HEAD, origin/Exercise_wk4, master, Exercise_wk4) HEAD@{5}: checkout: moving from old-state to Exercise_wk4
21a3b5a (old-state) HEAD@{6}: checkout: moving from Exercise_wk4 to old-state
176137b (origin/master, origin/HEAD, origin/Exercise_wk4, master, Exercise_wk4) HEAD@{7}: checkout: moving from 21a3b5ac1535703f4ce0d6feb2ccf3703f95eee3 to Exercise_wk4
21a3b5a (old-state) HEAD@{8}: checkout: moving from Exercise_wk4 to 21a3b5a
176137b (origin/master, origin/HEAD, origin/Exercise_wk4, master, Exercise_wk4) HEAD@{9}: checkout: moving from 21a3b5ac1535703f4ce0d6feb2ccf3703f95eee3 to Exercise_wk4
21a3b5a (old-state) HEAD@{10}: checkout: moving from Exercise_wk4 to 21a3b
176137b (origin/master, origin/HEAD, origin/Exercise_wk4, master, Exercise_wk4) HEAD@{11}: checkout: moving from 21a3b5ac1535703f4ce0d6feb2ccf3703f95eee3 to Exercise_wk4
21a3b5a (old-state) HEAD@{12}: checkout: moving from Exercise_wk4 to 21a3b5a
176137b (origin/master, origin/HEAD, origin/Exercise_wk4, master, Exercise_wk4) HEAD@{13}: checkout: moving from master to Exercise_wk4
176137b (origin/master, origin/HEAD, origin/Exercise_wk4, master, Exercise_wk4) HEAD@{14}: checkout: moving from Exercise_wk4 to master
176137b (origin/master, origin/HEAD, origin/Exercise_wk4, master, Exercise_wk4) HEAD@{15}: checkout: moving from Exercise_wk4 to Exercise_wk4
176137b (origin/master, origin/HEAD, origin/Exercise_wk4, master, Exercise_wk4) HEAD@{16}: checkout: moving from master to Exercise_wk4
176137b (origin/master, origin/HEAD, origin/Exercise_wk4, master, Exercise_wk4) HEAD@{17}: checkout: moving from SofieIssue to master
1f488c6 (SofieIssue) HEAD@{18}: commit: remove pipe operator
4ead406 HEAD@{19}: commit: update readme.md
We are now looking at the reflog - the log of where the HEAD has been. It used to be at
9e6c38c HEAD@{1}: commit (amend): add two text filesbut is now at
493609e (HEAD -> Wk4_markup) HEAD@{0}: reset: moving to 493609eWe can use this history of where the head has been to go back to the previous step. In other words, if we would like to undo a commit, we can always go back to the previous HEAD stage –> the HEAD has been moved one step forward by the commit. Likewise, if we would like to undo a hard reset, we can also go back to the previous HEAD stage –> the HEAD has been moved one step forward by the reset.
To undo it all, we can use the indicator that is referenced by the reflog:
% git reset --hard HEAD@{1}
HEAD is now at 9e6c38c add two text files
Using reflog and HEAD is in this case more flexible than using log and the SHA-1 hash. reflog yields the log of all changes in the pointer HEAD, while log only gives you the history of the logged commits. Once a commit is undone, it is gone from the log. Moreover, using reflog and HEAD allows you to go back into the future, like in the above example.
NOTE: Do not wait too long to undo your resets. After a few days/weeks garbage collection may kick in and Git will eventually see old commit as unreferenced. This makes them irretrievable
3.6.10 Redo a commit
A hard reset brings you back to a previous state. It loses all changes that have been committed since. If you’d like to undo a single commit and erase the commit message, but not throw out the modifications:
git reset --soft 493609e We are now back at the initial commit, but all changes since have been staged. We can commit these changes as
% git commit -a -m 'everything in a single commit'
[Wk4_markup 525efa5] everything in a single commit
 7 files changed, 36 insertions(+), 1 deletion(-)
 create mode 100644 Gerko/Assignment 1/Vink.jpg
 create mode 100644 Gerko/Assignment 1/Vink.pdf
 create mode 100644 README.Rmd
 create mode 100644 add_text_file.txt
 create mode 100644 markup_sticker_SMALL.png
If we study the log, we find that there are now only two commits.
% git log --pretty=oneline
5fe2c1bd44b1dbc92172b85dec3d87ced7073deb (HEAD -> Wk4_markup) everything in a single commit
493609efa7ce659ebebf5a0d0300f23788397e68 Initial commit
3.6.11 Merging branches
Let’s see if we can merge the Wk4_markup branch into the Exercise_wk4 branch.
First we need to checkout the branch we would like to merge into:
% git checkout Exercise_wk4
Updating files: 100% (174/174), done.
Switched to branch 'Exercise_wk4'
Your branch is up to date with 'origin/Exercise_wk4'.
Then we can attempt to merge:
% git merge Wk4_markup
Auto-merging README.md
CONFLICT (content): Merge conflict in README.md
CONFLICT (add/add): Merge conflict in README.Rmd
Auto-merging README.Rmd
Automatic merge failed; fix conflicts and then commit the result.
We’ve now effectively created a conflict. A conflict must be resolved before a merge is possible. If you switch to GiHub desktop, you’ll see this pop-up

You can use the drop-down menu to choose either modified file version as the one to keep after merging (which means you’ll throw out the other version from the other branch)
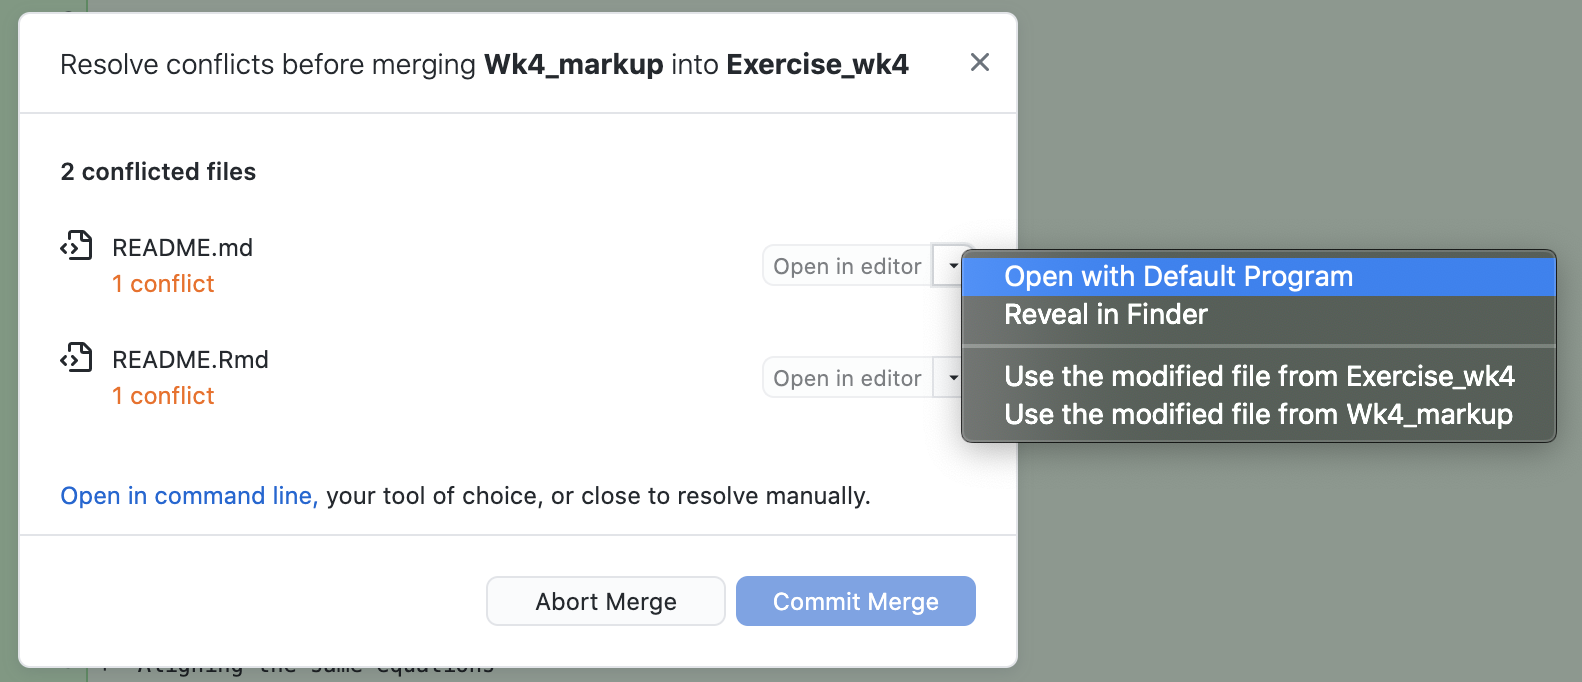
There is also the option to open the file in the editor and manually resolve the conflict.
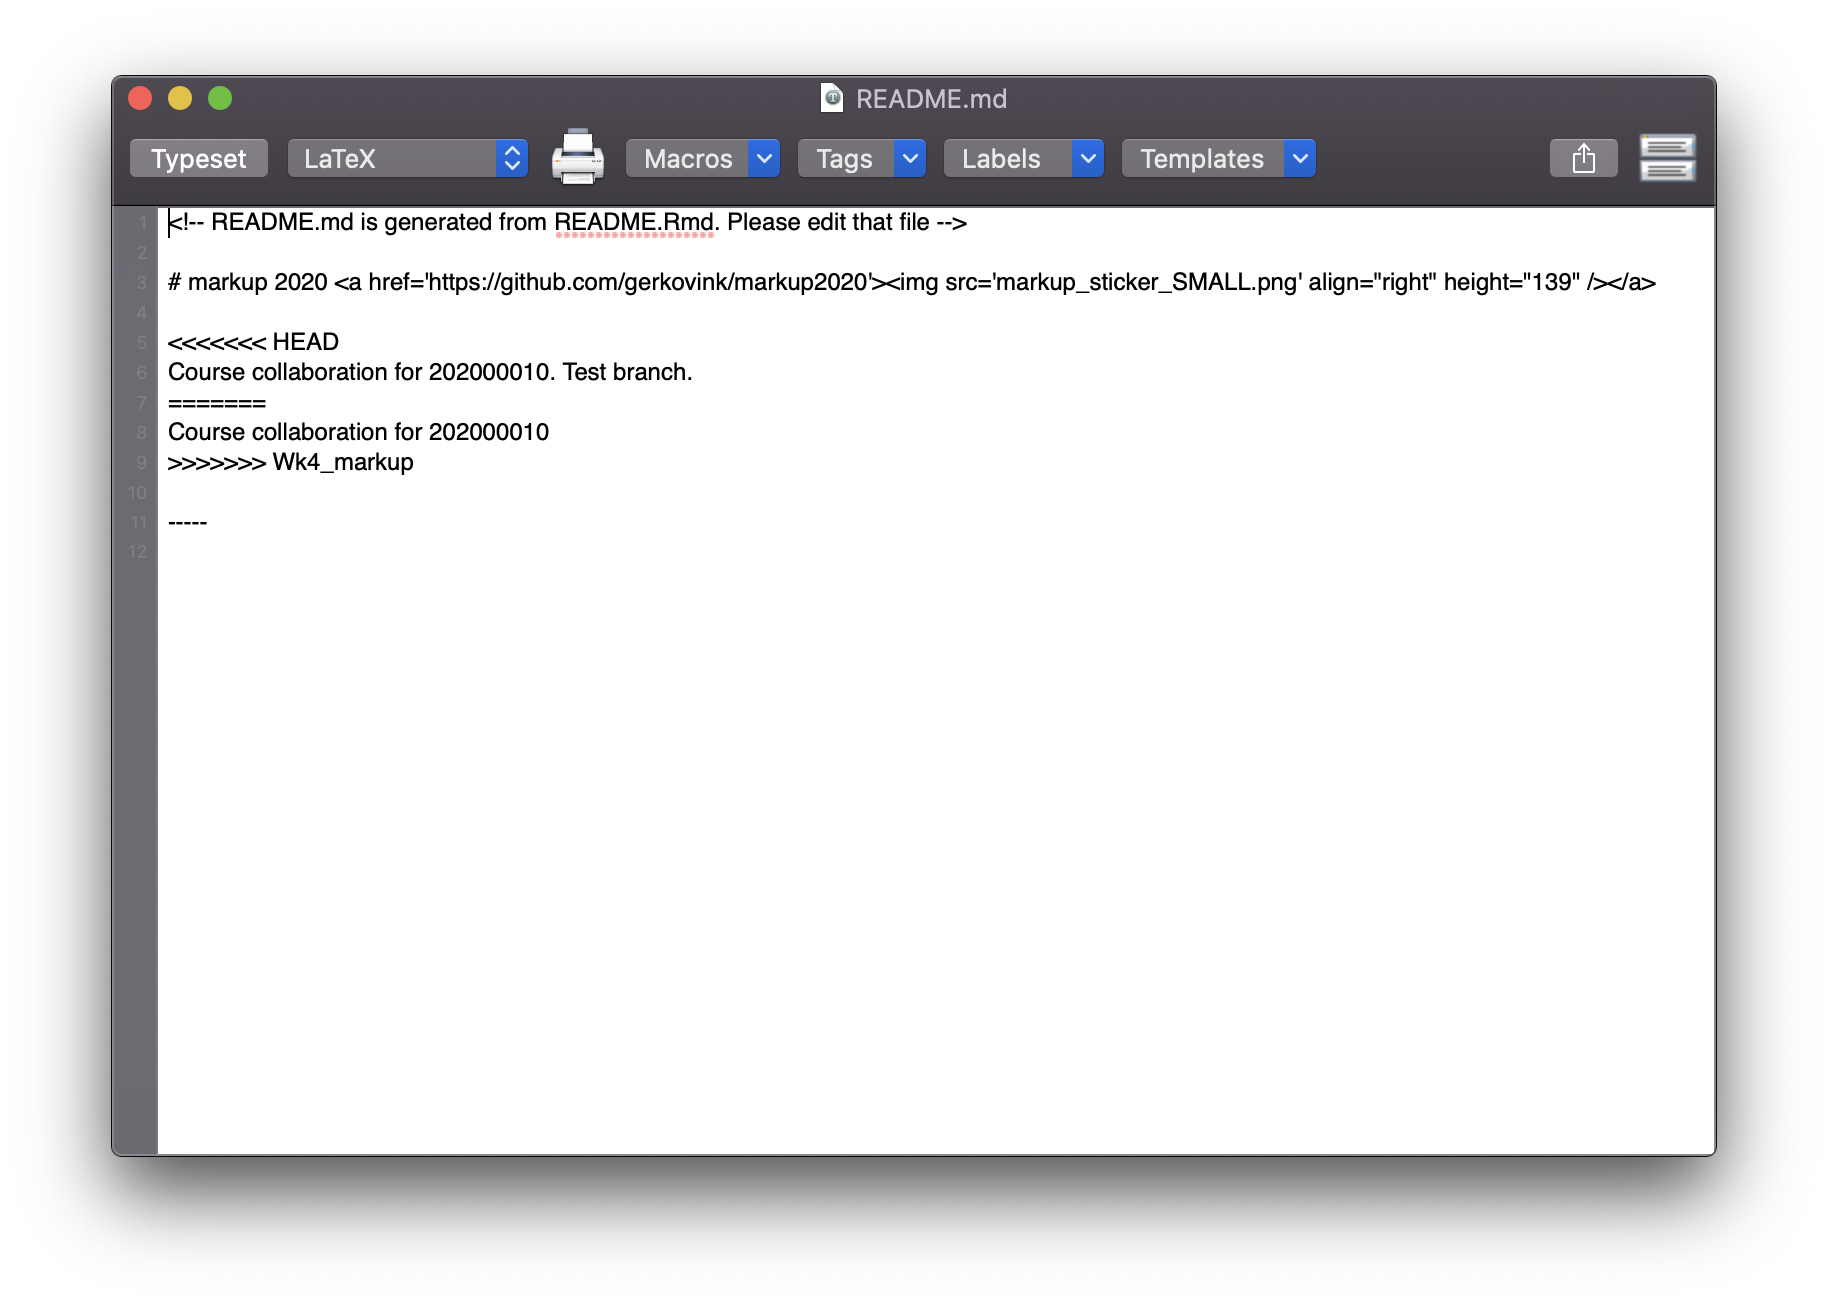
We now see the detail about this conflict. Remember that we took an old state as our point of departure? After that point I have changed the header of the Readme.Rmd file. This conflict needs to be resolved before we can merge these branches.
3.6.11.1 Resolve the conflict
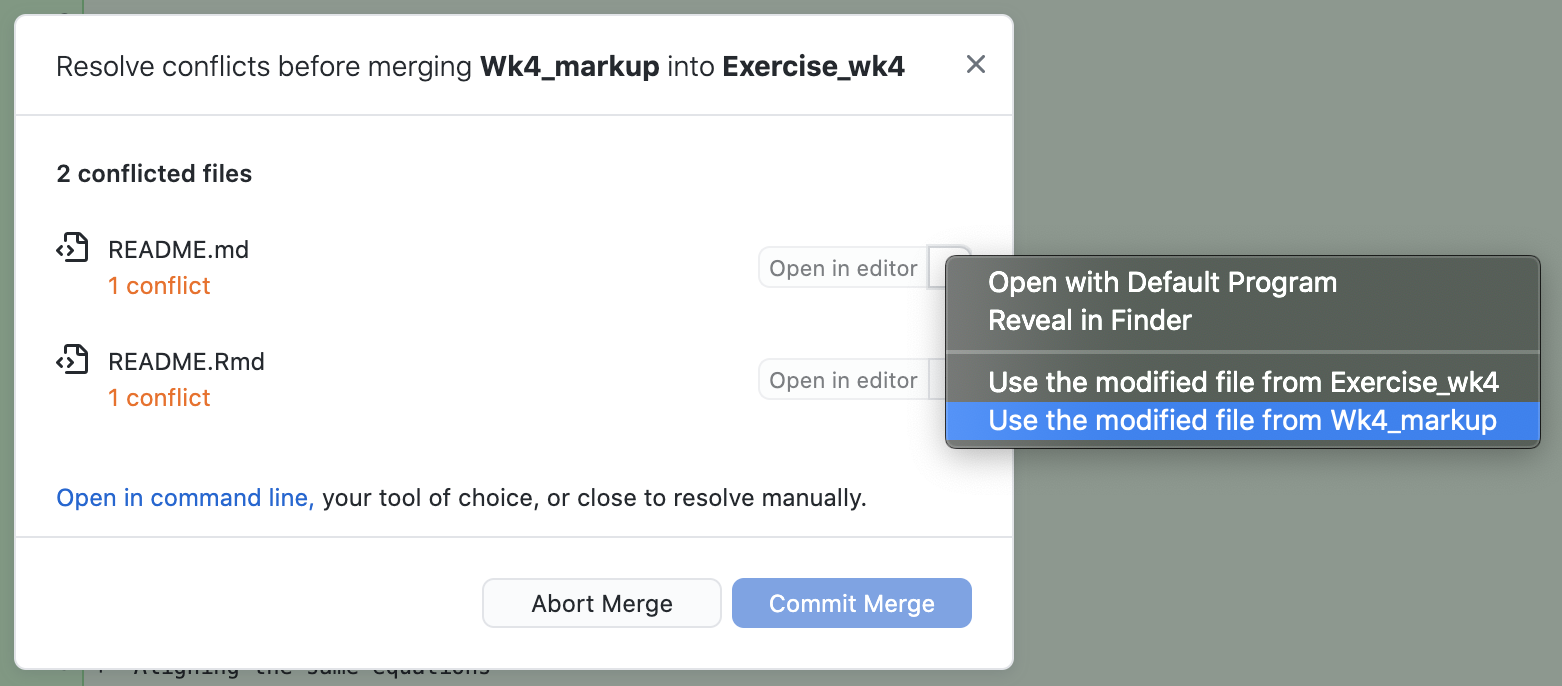
Choose Wk4_markup as the reference. Throw out the version from Exercise_wk4. You can do this manually or by choosing the following drop-down item in GitHub Desktop:
After that, we can stage the changes and commit them in the Exercise_wk4 branch:
% git add -A
% git commit -m 'conflict resolved'
3.6.12 Hand in your exercise
- Take the merged
Exercise_wk4branch as your point of departure - Create a new branch named
Wk3_yourname - Change the filename of the text file to
yourname.txt - Stage the changes
- Commit the changes with a custom message
- Publish your branch on GitHub
- Do a pull request that can be automatically merged.
- Post an issue in your forked template (remember Section 1), wherin you properly reference your PR to the old course repo.
You should now have all the skills to fill your template with the course deliverables and exercises. Now would be a good time to update your deliverables repository. If you have any questions, please post them as an issue to the course repository.
3.6.13 Solution
% git branch Wk4_gerkovink
% git checkout Wk4_gerkovink
Switched to branch 'Wk4_gerkovink'
% mv add_text_file.txt gerkovink.txt
% git add -A
% git commit -m 'gerko`s commit'
[Wk4_gerkovink fb26e75] gerko`s commit
 1 file changed, 0 insertions(+), 0 deletions(-)
 rename add_text_file.txt => gerkovink.txt (100%)
% git push origin Wk4_gerkovink
Enumerating objects: 15, done.
Counting objects: 100% (15/15), done.
Delta compression using up to 8 threads
Compressing objects: 100% (10/10), done.
Writing objects: 100% (10/10), 1002 bytes | 1002.00 KiB/s, done.
Total 10 (delta 7), reused 0 (delta 0)
remote: Resolving deltas: 100% (7/7), completed with 3 local objects.
remote:
remote: Create a pull request for 'Wk4_gerkovink' on GitHub by visiting:
remote:      https://github.com/gerkovink/markup2020/pull/new/Wk4_gerkovink
remote:
To https://github.com/gerkovink/markup2020.git
 * [new branch]      Wk4_gerkovink -> Wk4_gerkovink